Sayid... Step by step....
I was drawing a picture of Sayid this weekend.. And once I got into it I thought it'd be fun to document my steps and post them. So here goes....
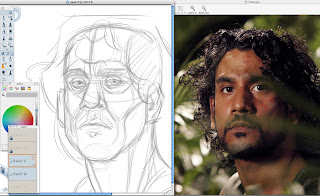 So.. I work with 2 windows open side by side. When drawing on paper I like to get as close to my reference as possible. Working like this digitally is as close as I can get to that feeling.. I'll open my ref image in Preview and open sketchbook and slide my window to half the screen.. From there I usually do some loose ruff work.. Sometimes on multiple layers until I get a foundation that I like.. Or at least on I know I can work with to make work later.. At this point it rarely looks anything like the ref. Unless I'm very lucky. At this stage I work with a rather large pencil brush and shades of grey.
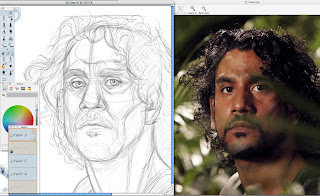 The next thing I do is create a new layer and take the standard pencil brush and go into it in more detail. A tight pass. This is one of the more time consuming steps for me as it's here that I try to nail the likeness and get all the detail in place to help me with the shading later. This is where I decide how much caricature I'm going to use. I'm going for a very graphic style so I'll go in and draw out hair patterns and hatch in shaded areas. During this stage I'll often zoom in on my open windows so that each are only showing a small segment of the overall image.. It helps me get the smaller details down.. But it can also really throw off your overall images balance if you work too zoomed in. I always have to zoom and and check on the overall every few minutes...
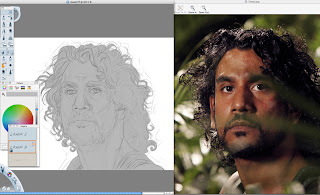 Once I have a tight that I'm either happy with .. or sick of working on... usually the second.. I'll add a mid tone on a layer underneath the tight. This is the step where I either hide or delete the ruff layers...
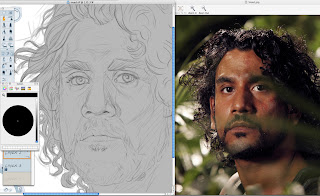 Once the mid tone is there. I'll often go back to the tight layer and darken things up.. And ad more hatching
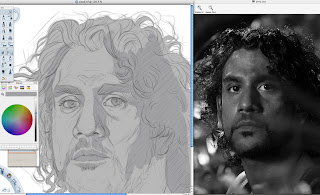 Then I'll start getting into the tones by laying down a mid dark tone. I use the paintbrush for the tones at this stage..Sometimes I'll save a greyscale version of the ref image at this point to help me figure out where all the tonal breaks are...
 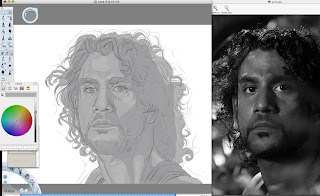 Then I'll take that tone down a step and blend start to work into it from the overall mid tone.. Sometimes hatching.. Sometimes being more graphic with it.. it all depends on what I'm drawing and the mood I happen to be in..
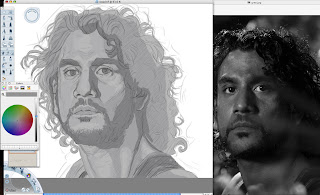 Then I'll select that same mid tone dark and slide it down a shade an flesh out some of the darker areas..
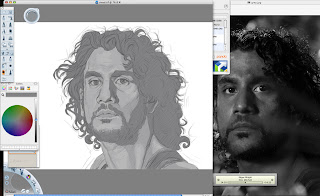 I went as far to apply the darker shade as the mid tone for his hair as well.. I'll usually try to nail down the mid tone for the hair while I'm doing the skin tones. But i leave the highlights and shadows on the hair for later. Just a personal thing.. i can split my focus that's all...
 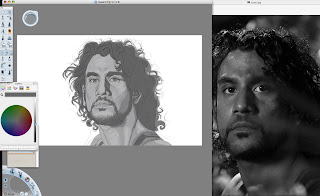 As you can see.. I decided that the last tone was a bit too wimpy.. so I went a tad darker with it. I've been going a little washed out with the contrasts on my portraits lately. So there is rarely any hard blacks.. even if the ref suggests otherwise..
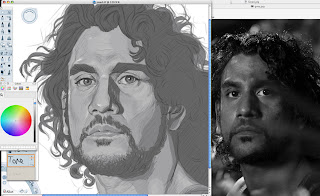 Once I'm reasonably ok with the shadows I've applied I'll head in the opposite directions and start applying highlights the same way that I did the shadow. I'll usually add a much darker dark to the eyes just before I do the highlights.. Just to draw a bit of focus to the eyes. I do this on the same layer with the same paint brush.. Same with the highlights.. all on the same layer...
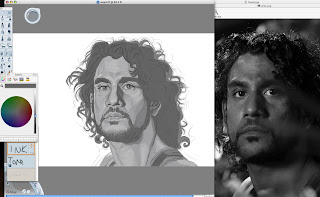 Then I'll make a new layer and go in with the marker tool and start hatching out some tones with a dark grey.. A grey that's slightly darker than the darkest tone I have going at the moment. I'll also switch over to the pencil tool at this point and on the same layer start hatching in white.. Or very light grey.. To bring out more highlights...
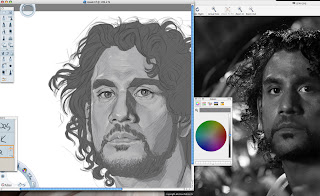 Then I'll switch back to the pain layer and get a white or close to white and apply the hard highlights in the eyes..
 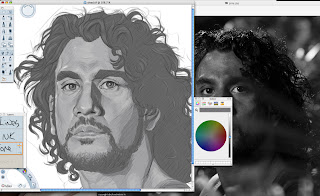 Then back to the paint layer and with the brush tool start figuring out the hair. Starting with the mid tone for the highlights..
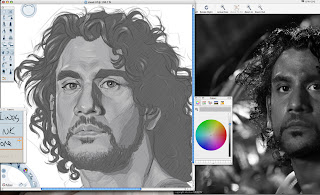 I usually use 3 or so tones in the hair.You only really need 3 tones to make something look realistic.. A mid tone.. Shadow.. and Highlight. But sometimes you'll want to smooth out the transition between the 3 of them....
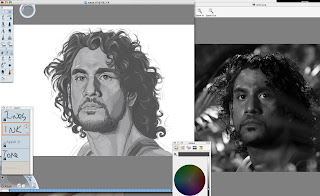 I went back and added a shadow tone to the hair. it just felt a little flat to me without it..
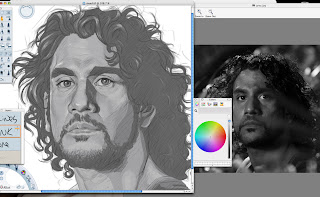 Then I got back on the marker layer and do a loose pass with a dark tone.. Something a bit darker than the darkest tone I have going.. Just to add some depth to some areas and to define things that might have gotten a bit sloppy in some other steps..
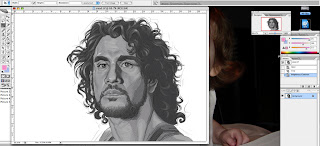 Then I open the file in Photoshop and mess with the contrast a bit.. Not too much. I want it a bit flat.. and then a little crop and save for web and voila!!.
 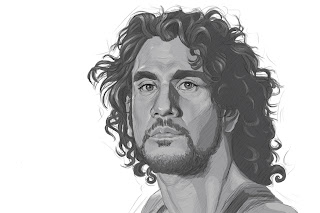 I now have a slightly wonky drawing of Sayid... Which.. if you noticed.. Was spelled wrong on my working file the entire time due to the ref image having it spelled wrong.
 So that's what goes into me doing one of these little grey scale portrait dealies that I've been doing for the past while.. I've been going through a Drew Struzan faze which has kicked me into portrait drawing mode.. Nothing like looking at an artist like Drew who can really capture a likeness to make you either wanna stop drawing.. or wanna draw more.. He knows how to add that little bit of caricature to make the portrait look more like the person than the actual person does.. It's a hard line to draw.. Too much caricature and it looks too cartoony.. Not enough.. and it looks generic.. without likeness. That's why the initial loose ruff stage is so important to me.. it's the place where I can exaggerate and then pull back until I get something I like.. I still tend to lean towards the generic a bit too much though...
Anyway.. Thanks for looking and reading.. If anyone has ;) See ya!

5 Comments:
Awesome post Jason! So happy to see you posting again. Good ol' Sketchbook Pro.... far to addictive!
Cheers, Ryan
thanks for sharing that Jason! Sweet to see the magic unfold. WOW
Slick
wow! it was like watching a good playoff game, i had my doubts in teh begiining, then a few images starting working, then they wnet down hill again but then.....you pulled it right before the buzzer, banged in the rebound and WOW!
I need you to do play-by-play on my drawings more often Kyle.. ;)
Post a Comment
<< Home